Basically, pptPlex lets you display the structure of your slides and then zoom in, drill down and bounce around from slide to slide in a fashion that is more visually engaging for the viewer. This little known free add-in from OfficeLabs is guaranteed to wow the socks of a jaded academic or corporate audience. Plus, it makes the data easier to understand. It’s sort of hard to explain what pptPlex does for your PowerPoint presentations, so you may as well check out this overview video first:
Neat, huh? Okay, here’s how you can make one of these slick pptPlex presentations yourself:
Download pptPlex from OfficeLabs. You can read the backstory about pptPlex if you want to get amped up about the technology, or you can just go ahead and click Try It! to get started. Note: pptPlex now supports Office 2007 and Office 2010 in Windows Vista, Windows XP and Windows 7.
Run the .msi installer and then launch PowerPoint. pptPlex doesn’t alter any of PowerPoint’s core functionality. It simply adds the pptPlex tab at the end of the ribbon. Click it to access pptPlex.
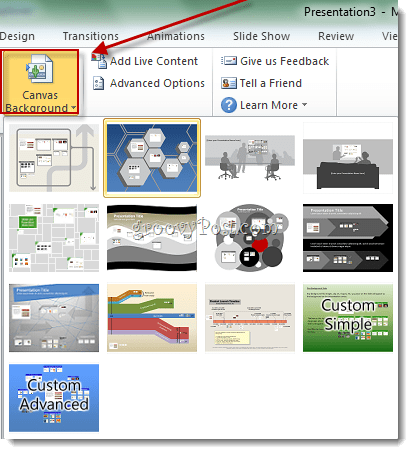
Click Canvas Background to get started. pptPlex comes with a few very snazzy looking templates that work well as a starting point for a pptPlex PowerPoint presentation. Try out a few of the different templates to see which one is going to work best with your presentation.
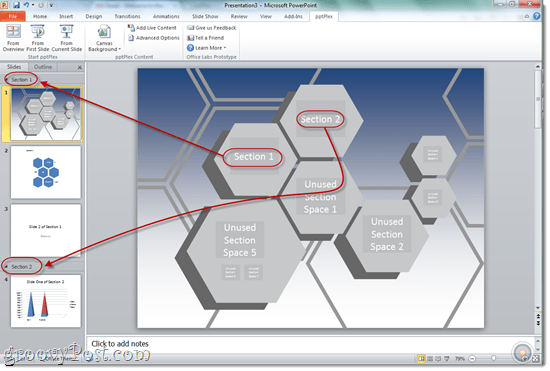
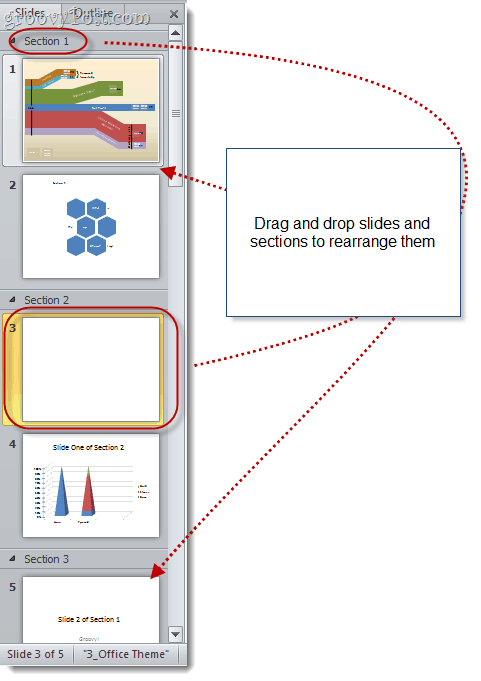
The blank template will be populated with placeholder text that reads something like “unused section space 1,” “unused section space 2,” etc. To add slides into those areas, you first have to add sections. In the screenshot below, I’ve already done so, and you can see how the sections match up with the layout in the PowerPoint presentation.
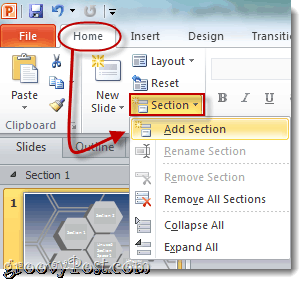
To add sections in PowerPoint 2010, click the Home tab and click New section, just to the bottom-right of the New Slide button. Next, click Add Section.
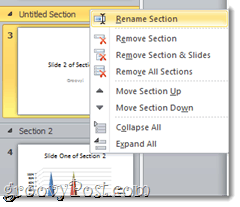
If you’re running PowerPoint 2007, you don’t have sections, so you’ll have to add sections from the pptPlex tab. 6. This will add an untitled section above the slide you had selected. Right-click it and choose Rename Section and change it to something meaningful, since this will serve as a header for all of the slides beneath it.
Add slides into the section you just created. These will show up in your pptPlex presentation in the corresponding areas where the placeholder text is. For example, the first section of slides will be placed in the area labeled “unused section space 1,” and the second section of slides will appear in the area labeled “unused section space 2,” and so on, regardless of what you name your sections. You can drag and drop slides and sections to rearrange them as you see fit. Note that after you view your pptPlex presentation, the section names will get plotted onto your overview slide appropriately.
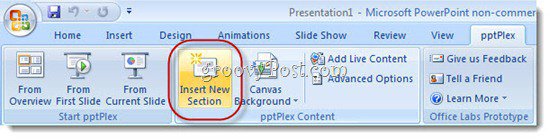
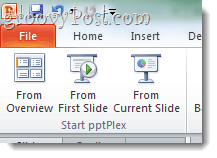
When you’re all done, go back to the pptPlex tab and launch your presentation either by clicking From Overview, From First Slide or From Current Slide.
The differences between these are self-explanatory, and the best one for your presentation depends on the structure of your talking points. For example, you could start from the Overview to give them an outline of what you’ll be talking about followed by a more detailed discussion of each of your points. Or, you could start from the first slide and move through the slides in order, finally ending on the Overview to drive home the “big picture” (literally and figuratively). Once you’re within a pptPlex presentation, use the following commands to navigate through your presentation:
The Space Bar advance to the next slide. If there are multiple slides in a section, pptPlex will automatically make a brief stop over at the top of the section, giving you an overview of the slides within. This is a nice way to frame the key points of your presentation before diving into details.Up/Left moves backwards through the presentation.Down/Right moves forwards through the presentation.Click and drag lets you pan the presentation around without zooming, just like you might if you were viewing a mobile webpage.Double-click zooms in on an item. If you double-click a section, you’ll see the entire section. If you double-click a frame, it’ll zoom into the frame. If you double-click within a frame, you can zoom in further on individual areas of the frame.Right-click zooms out of the current frame. If you are zoomed in on a frame, a single right-click brings the whole frame into view. Right-click again to view the section. Right-click yet again to view the Overview.
One very groovy development for pptPlex is that it now supports multi-touch in Windows 7. The multi-touch gestures are:
Touch with one finger to zoom in.Touch with two fingers to zoom out.Swipe right to advance to the next frame.Swipe left to go back to the previous frame.
You can also pinch/pan just like you would on an iPhone. That’s basically what you need to know to get started. You can also apply pptPlex canvases to existing PowerPoint presentations. Just load the canvas and then rearrange your existing slides into the appropriate sections. You can also tweak the transitions and the flow among sections and slides by clicking Advanced Options in the pptPlex tab. For instance, you can skip the section preview, or arrange the slides so you navigate them in a zig zag or spiral fashion. All of these are minor flourishes, but when presentation counts, they can go a long way.
Overall, there’s a lot of potential in pptPlex, especially if you’re creative. The timeline canvas is an excellent example of how pptPlex can help audiences understand the details in relation to the bigger picture. The pptPlex canvas where it just shows a bunch of suits sitting around a whiteboard presents content in a manner that is less mimetic of its form, but it still adds enough pizzazz to make people think that you’re a PowerPoint wizard. And isn’t the glory of showmanship ultimately what it’s all about? P.S. for a groovy video of multi-touch pptPlex in action, check out this demo from OfficeLabs:
Comment Name * Email *
Δ Save my name and email and send me emails as new comments are made to this post.


![]()
